# Citrix SecurSpaces on Hyper-V: From Empty VM to Working Workspace
> My Hyper-V home-lab setup for Citrix SecurSpaces, from an empty Ubuntu VM to a working Python workspace.
- Published: 2026-10-02
- Author: Sven Scharmentke
- Canonical: https://svnscha.de/posts/securspaces-hyperv-lab/
- Tags: citrix, securspaces, hyper-v, homelab, ubuntu, python, developer-workspaces
---
I wanted to try Citrix SecurSpaces on my Windows PC using Hyper-V. The platform runs in a single Ubuntu VM, so I could get a demo running without building a Kubernetes cluster first.
I work at Citrix on a different team. You may know SecurSpaces by its earlier names, Secure Developer Spaces and Strong Network.
I started with Citrix's 1-Click evaluation tooling and the local deployment flow from the XenServer guide, then adapted the VM setup and networking to Hyper-V.
For current instructions, see [Deploy an evaluation environment](https://docs.citrix.com/en-us/securspaces/deploy/evaluation/), including [Prepare a Hyper-V VM](https://docs.citrix.com/en-us/securspaces/deploy/evaluation/hyperv). These are my lab notes, covering setup issues and checks that my Python file survived pausing the workspace and restarting the VM.
**Jump to:** [VM setup](#build-the-hyper-v-vm) · [Installation](#install-securspaces) · [Configuration](#configure-securspaces) · [First workspace](#create-your-first-workspace) · [Restart](#restart)
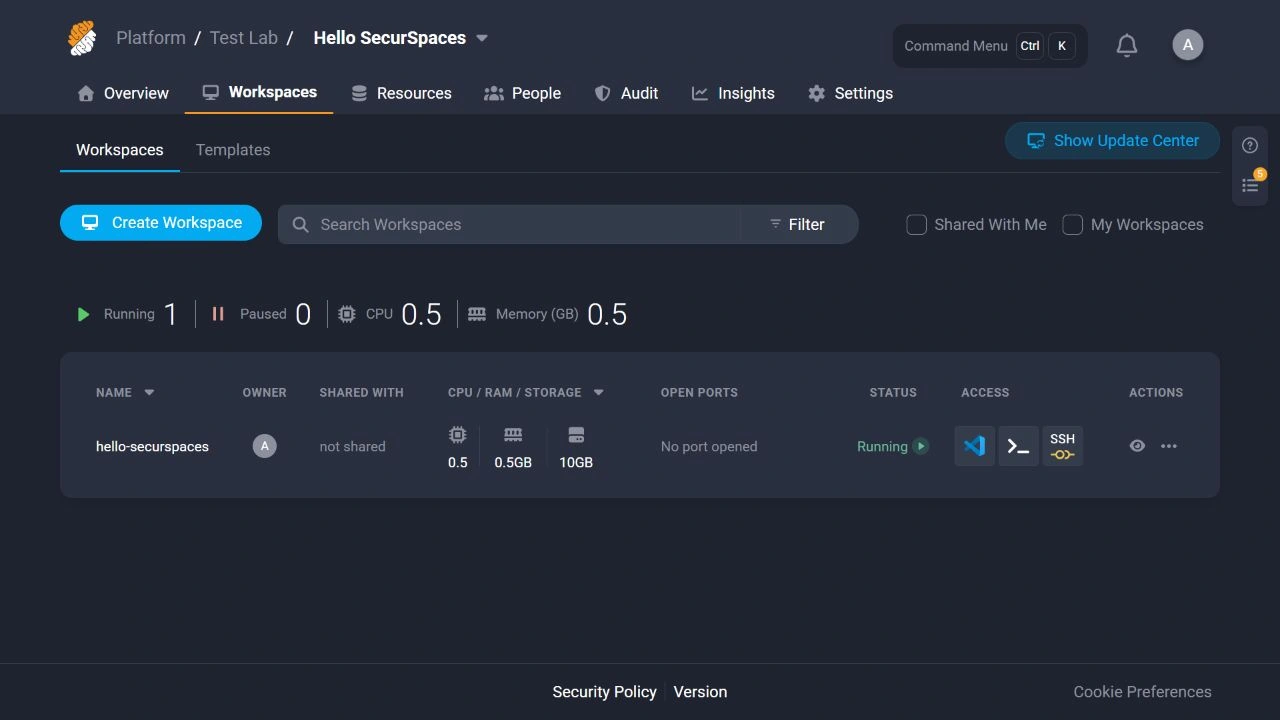
The hello-securspaces workspace running in Test Lab.
## Before you start
You need a Windows host with Hyper-V available, an Ubuntu Desktop ISO, and Docker Desktop running Linux containers on the installer host. The VM needs internet access for the deployment and image downloads. Keep its credentials and generated installer files outside the blog or any public repository.
There are two places to work:
| Where | What runs there |
| --- | --- |
| Windows PC | Hyper-V, Docker Desktop, the Citrix installer container, and my browser |
| New Ubuntu VM | K3s, the SecurSpaces services, the database, ingress, and eventually the developer workspace |
The installer container on Windows generates a deployment script. That script runs inside Ubuntu, where the platform lives.
Some image names and paths still contain `strongnetwork`, `strong-network` or `sds`. Those names appear in the installer I used even though the login page says Citrix SecurSpaces.
### My lab configuration
Here is the configuration I ended up with:
| Setting | My demo lab |
| --- | --- |
| Host | Windows 11 Pro with Hyper-V; 32 GB physical RAM |
| VM name | `SecurSpaces-Lab` |
| VM generation | Generation 2 |
| Guest OS | Ubuntu Desktop 24.04.5 LTS |
| Virtual processors | 4 |
| RAM | 16 GB, fixed allocation |
| Disk | 200 GB, dynamically expanding VHDX |
| Network | Hyper-V Default Switch |
| Platform version | 2026.9.0 |
| Intended workload | One developer workspace |
I tested the setup again from a blank disk using Citrix's Small size: 4 CPUs and 16 GB RAM. Leave enough free memory for Windows and your other applications. If Hyper-V reports `0x800705AA`, close some applications or stop other VMs to free up resources, then try again.
The disk is dynamically expanding, which means a 200 GB virtual disk does not immediately consume 200 GB on Windows. Images and checkpoints still need real disk space as they grow.
If you are repeating the installation, deleting a VM in Hyper-V does not necessarily delete its VHDX. Create a new disk and check its path. Attaching the previous disk would start the old installation instead of testing this guide from scratch.
## Build the Hyper-V VM
### 1. Create the VM
I automated the Ubuntu installation in my lab. These manual steps use the standard Desktop installer to reach the same starting point.
1. Download an **Ubuntu 24.04 Desktop** ISO from [Ubuntu's release page](https://releases.ubuntu.com/24.04/). My media was `ubuntu-24.04.5.1-desktop-amd64.iso`.
2. Open **Hyper-V Manager** and select your local host.
3. Choose **New → Virtual Machine** and name it `SecurSpaces-Lab`.
4. Select **Generation 2**.
5. Allocate **16384 MB** for the Small deployment. Leave **Use Dynamic Memory** unchecked for this fixed-size lab.
6. Connect the network adapter to **Default Switch**.
7. Create a **200 GB** virtual hard disk.
8. Select the Ubuntu Desktop ISO as the boot image and finish the wizard.
9. Open the VM's **Settings → Processor** and set **4 virtual processors**.
10. In **Security**, keep Secure Boot enabled and use the **Microsoft UEFI Certificate Authority** template for Ubuntu.
11. Start the VM, choose **Connect**, and install Ubuntu Desktop onto its new virtual disk. Create your own local administrator account; mine is `labadmin`.
12. After installation, shut down the guest, detach the ISO, and start it from the virtual disk.
The Default Switch was convenient because I wanted to use the demo from this Windows PC. It provides outbound connectivity for the VM, and the host can reach the guest's private address. Access from another laptop on the home network needs a separate networking plan.
I also keep the VM's automatic start action set to **Nothing** and its stop action set to **Shut down the guest operating system**. I can start the lab when I need it without adding another automatic workload at every Windows login.
### 2. Prepare and check Ubuntu
Use a fresh **Desktop** installation for this local installer. Do not preinstall Docker or Kubernetes in the target VM. In my case, the deployment script installed K3s and the platform components later.
Open a terminal **inside Ubuntu** and install the management tools:
```bash
sudo apt update
sudo apt install -y openssh-server curl
sudo systemctl enable --now ssh
```
For Hyper-V guest IP reporting, install the cloud tools matching the **running kernel**, then start the KVP service:
```bash
sudo apt install -y "linux-cloud-tools-$(uname -r)"
sudo udevadm control --reload-rules
sudo udevadm trigger --action=add --subsystem-match=misc
sudo systemctl enable --now hv-kvp-daemon
```
Reloading the device rules lets the newly installed KVP service find its Hyper-V device without a reboot.
On this Ubuntu Desktop image the kernel was `7.0.0-31-generic`. The generic `linux-cloud-tools-virtual` package selected 6.8 tools and the KVP service failed until I installed the matching package. If Hyper-V shows no IP address, `hostname -I` inside Ubuntu remains the direct check. Wait for package installation to finish before rebooting.
I also prevented this always-on lab guest from suspending while idle:
```bash
sudo systemctl mask sleep.target suspend.target hibernate.target hybrid-sleep.target
```
Then check the operating system, CPU features, memory, disk and address:
```bash
cat /etc/os-release
lscpu | grep -i avx
free -h
df -h /
hostname -I
```
Look for Ubuntu 24.04, an `avx` CPU flag, the expected memory, and the new disk. Save the VM's IPv4 address. Linux reports usable memory after reservations, so its displayed total can be a little lower than the allocation in Hyper-V.
From **PowerShell on Windows**, test SSH. Replace `YOUR_VM_IP` with the address from Ubuntu:
```powershell
ssh labadmin@YOUR_VM_IP
```
Use your own Ubuntu credentials or an SSH key. My lab uses a dedicated key and a local SSH configuration file. These credentials are separate from the SecurSpaces administrator account we create next.
Before installing the platform, I rebooted Ubuntu and checked SSH again. I also took a powered-off Hyper-V checkpoint called **Clean Ubuntu Desktop**. That gives me a known starting point if I need to repeat the installation. Restoring it discards everything installed after that checkpoint.
## Install SecurSpaces
### 3. Run the Citrix installer on Windows
Docker Desktop was already installed on my Windows host and running Linux containers. In **PowerShell on Windows**, create a private directory for the installer files:
```powershell
New-Item -ItemType Directory -Path "$env:USERPROFILE\SecurSpacesInstaller"
Set-Location "$env:USERPROFILE\SecurSpacesInstaller"
docker run --rm -it `
--mount "type=bind,source=$($PWD.Path),target=/strong-network/shared" `
strongnetwork/strong_installer:2026.9.0
```
This runs the installer interactively, pinned to the `2026.9.0` release I tested. If the wizard offers a newer version, choose **No** to use the same release.
Inside the **installer container**, start the local deployment wizard:
```text
deploy-demo --deployment-location=local --source-registry-region=EU --version=2026.9.0
```
The prompt reads `$ sds-cli`. It accepts CLI subcommands, not shell commands. Paste the line above as one line; do not prefix it with `sds-cli` or `/strong-network/sds-cli`, and do not use Bash line-continuation characters here. I reproduced an `unknown command` error with the executable path from my earlier draft.
Have these details ready:
| Prompt | What to enter |
| --- | --- |
| Administrator email | An address you will use to sign in |
| Administrator password | A strong password, or save the generated one |
| Machine capacity | Small (option 1), matching 4 CPUs and 16 GB RAM |
| Registry region | I chose EU |
| Target address | The Ubuntu VM's reachable IPv4 address |
Choose Small explicitly: the installer defaults to Medium. This selection does not resize the Hyper-V VM; its CPU and RAM must already match. The EU flag selects the source registry. When the wizard asks for a deployment region, select EU (option 2) too.
Save the administrator credentials separately from the Ubuntu login. The wizard prints a section headed **Generated Local Deployment Script**. Copy the complete script, starting with `#!/bin/bash` and ending before the separator below it. Save that text as `deploy.sh` in your private Windows installer directory using an editor that supports **UTF-8 without BOM** and **LF** line endings. Do not include the heading, separator, terminal prompt, or later DNS instructions. Check that the file is named `deploy.sh`, not `deploy.sh.txt`. The shared folder mount does not by itself save that terminal output as a script. **The script and installer output contain secrets.** They belong outside a public Git repository and outside blog screenshots.
Review the generated script before running it. For this fresh installation I used the configuration generated by the Citrix installer, including the sample users and image downloads. We'll create our own organization for the walkthrough.
### 4. Associate the hostname with the VM
The installer assigns an evaluation hostname under `try.sds.citrix.com`. When prompted for DNS and IP association, I entered the VM's private IPv4 address.
Do this promptly: Citrix documents a one-hour window after script generation for the initial association. My hostname resolves to the guest on the Default Switch. That DNS entry does not make the private VM accessible from the public internet.
Check the result in **Windows PowerShell**, substituting your assigned name:
```powershell
Resolve-DnsName YOUR_ASSIGNED_NAME.try.sds.citrix.com
```
The returned IPv4 address should match the Ubuntu VM. Keep using the assigned HTTPS hostname in your browser; an IP address in the address bar is not equivalent when checking the certificate.
The Default Switch's subnet and the guest's DHCP address can change. If access breaks after a host networking change, compare the VM address with DNS before changing platform settings.
### 5. Run the generated script inside Ubuntu
Keep the installer available while you deploy. In another **Windows PowerShell** window, copy the generated file to the guest:
```powershell
Set-Location "$env:USERPROFILE\SecurSpacesInstaller"
scp .\deploy.sh labadmin@YOUR_VM_IP:/home/labadmin/deploy.sh
ssh labadmin@YOUR_VM_IP
```
In the **Ubuntu SSH session**, restrict the file's permissions and start the script:
```bash
chmod 600 /home/labadmin/deploy.sh
sudo sh -c 'umask 077; exec bash /home/labadmin/deploy.sh'
```
Let it finish. There are container images to download and several services to bring up. In my lab the guest deployment script exited successfully and installed K3s `v1.36.4+k3s1`, SecurSpaces `2026.9.0`, MongoDB, and the NetScaler ingress components. The generic workspace image pulled was version `2.3.7`.
Those are the versions I observed. Pinning the Citrix installer does not mean every dependency selected by its generated script is pinned forever.
Once the script has finished, check the cluster **inside Ubuntu**:
```bash
sudo kubectl get nodes
sudo kubectl get pods -A
sudo kubectl top nodes
free -h
```
For ongoing service pods, look at **READY** as well as **STATUS**. A pod can say `Running` while its application is still getting ready. The platform services became Ready; the NetScaler pod contains two containers and showed `2/2`. Workspace pods are a separate check once a workspace exists.
#### Wait for initial data and licensing
The guest script finishing does not mean every background initialization step has finished. The backfill job initializes the evaluation license and sample data. On this fresh run I left the generated configuration unchanged; no manual repair was needed. Its successful log message was:
```text
One Click VM Demo Data Successfully Initialized.
```
To inspect the job while it is running, use these commands **inside Ubuntu**:
```bash
sudo kubectl get jobs
sudo kubectl get pods
sudo kubectl logs job/JOB_NAME
```
Replace `JOB_NAME` with the backfill job listed by your cluster. Completed jobs can be cleaned up automatically, so an empty job list later does not show whether initialization succeeded. Keep full logs private: they can contain deployment details and credentials.
During startup, the logs briefly reported an expired license before initialization completed. Opening the browser too early also showed a License step with Community selected and Next disabled. I waited for backfill to finish and reloaded the page. The evaluation license was then in place and the wizard continued with its three configuration steps. I did not switch to Community or modify the database.
### 6. Check HTTPS and sign in
From **Windows PowerShell**, check the assigned URL:
```powershell
curl.exe --head https://YOUR_ASSIGNED_NAME.try.sds.citrix.com/
```
My endpoint returned **HTTP 200**, and certificate verification passed. I did not need an insecure TLS option or a browser exception.
Open your assigned URL in the browser. Enter the **SecurSpaces administrator email**, choose **Proceed**, and enter the administrator password from the installer. The Ubuntu account is only for managing the VM.
After initialization completed, the setup wizard showed **Register Sign-In Domain → Code Repository Applications → Organization**. The evaluation license had already been applied.
## Configure SecurSpaces
I kept this a single-owner lab: local administrator login, no corporate identity provider, and no external repository connection. The three levels in the interface are:
| Level | What I use it for |
| --- | --- |
| Platform | Settings for this entire SecurSpaces installation, including licensing |
| Organization | My personal home-lab area: **Test Lab** |
| Project | The environment for this walkthrough: **Hello SecurSpaces** |
### 7. Choose the sign-in and repository setup
#### Sign-in domain
For this lab, the existing local administrator login is all we need to get our first workspace running, so I skipped domain registration.
I also repeated the setup with a personal email address. Local sign-in worked the same way, with no domain registration or identity-provider connection needed for this walkthrough.
If you're evaluating your own identity provider, this is a separate piece of configuration to plan. It isn't required for my single-owner Hello World example.
#### Repository applications
The next screen offers code repository applications. Those connections become useful when workspaces need to clone private repositories and obtain the right credentials.
I selected **Skip** here too. We'll create a Python file directly in the workspace, so we can try the IDE before connecting a GitHub or GitLab repository.
### 8. Create the organization and project
On the **Organization** step:
1. Enter **Test Lab** as the organization name, or choose your own name.
2. Enter **Hello SecurSpaces** as the initial project.
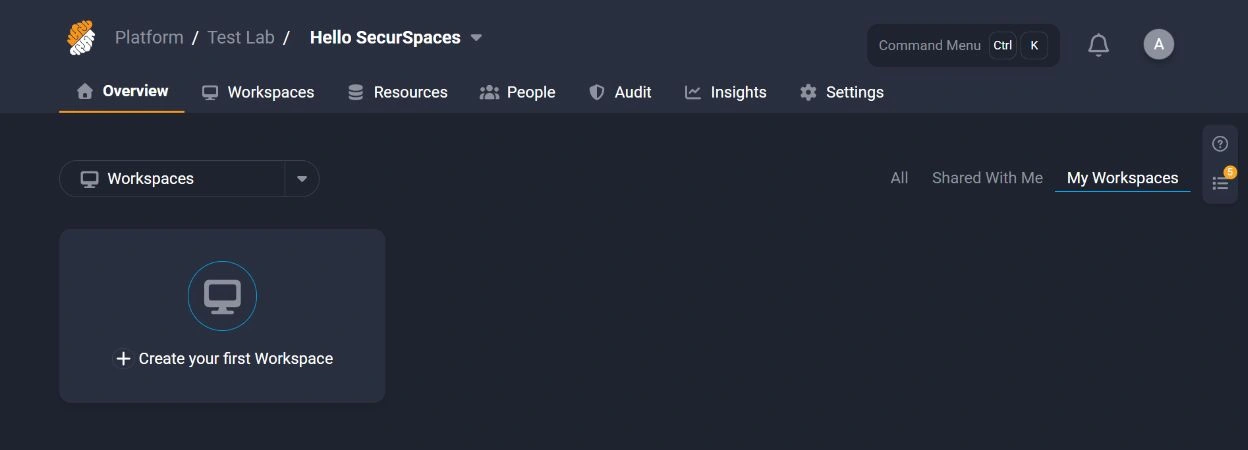
3. Select **Finish**. The wizard opens **Hello SecurSpaces** inside **Test Lab**.
The new project, ready for its first workspace.
After finishing the wizard, open the avatar menu at the top right and select **Theme** to switch to dark mode. The first-run wizard has no theme control. The screenshots here use the native dark themes.
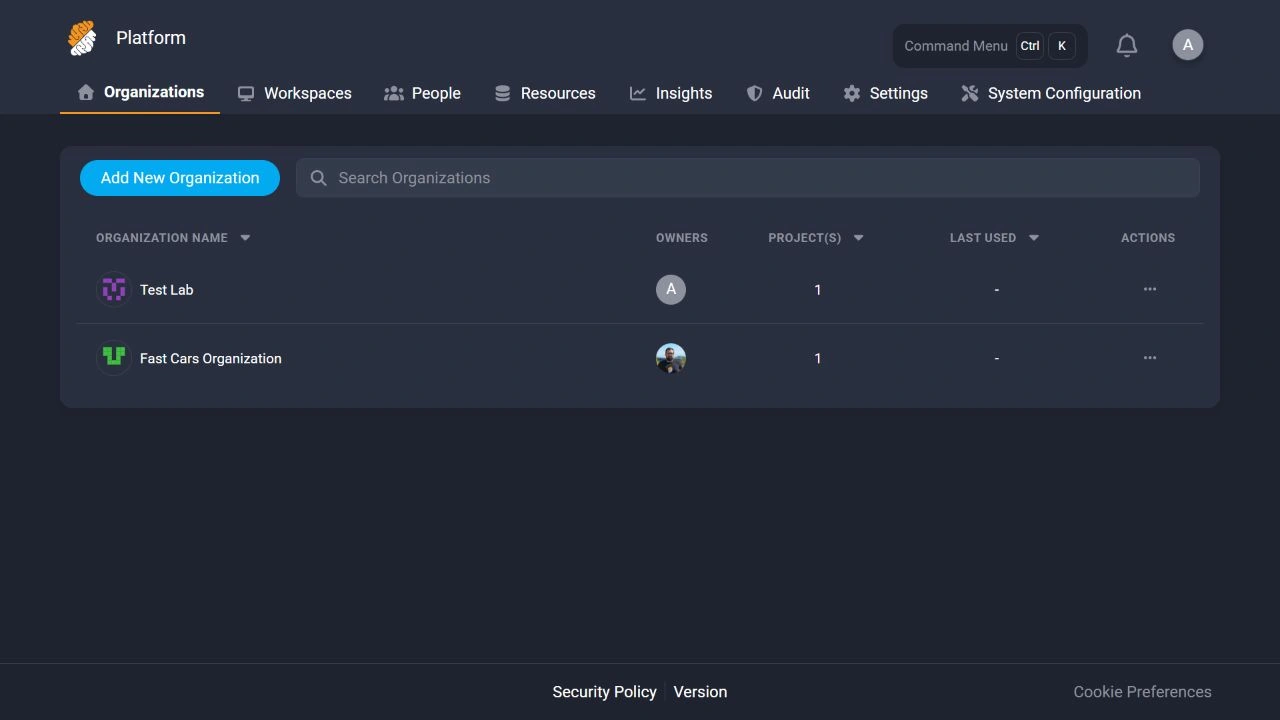
The evaluation also creates the sample **Fast Cars Organization**. I saw it with both my Citrix address and a personal address.
To return to your own project, select **Platform** in the breadcrumb, open **Test Lab** in the **Organizations** list, then select **Hello SecurSpaces** under **Projects**. The avatar menu's **Your Organizations** entry opens the same organization list. Before creating a workspace, check that the breadcrumb reads **Platform / Test Lab / Hello SecurSpaces**.
Test Lab alongside the evaluation's sample organization.
You can leave the sample organization in place and follow the walkthrough in **Test Lab**.
### 9. Check the license
Open **Platform → System Configuration → License** to check your license limits and expiry.
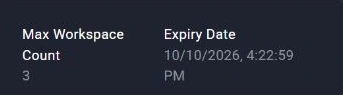
My Small installation showed **1-Click VM**, with limits of 100 users and 3 workspaces. The VM still needs enough resources for whatever you run. I only wanted one small workspace.
Check when your evaluation license expires before planning a demo. The TLS certificate has its own expiry date.
The workspace limit and expiry shown on the license page.
## Create your first workspace
Now we can put SecurSpaces to work: open an editor in the browser, save a Python file, and run it in our first workspace.
### 10. Choose the workspace name, owner and image
Navigate to **Test Lab → Hello SecurSpaces**. On a new project's overview, choose **Create your first Workspace**. The **Workspaces** page also has a **Create Workspace** button.
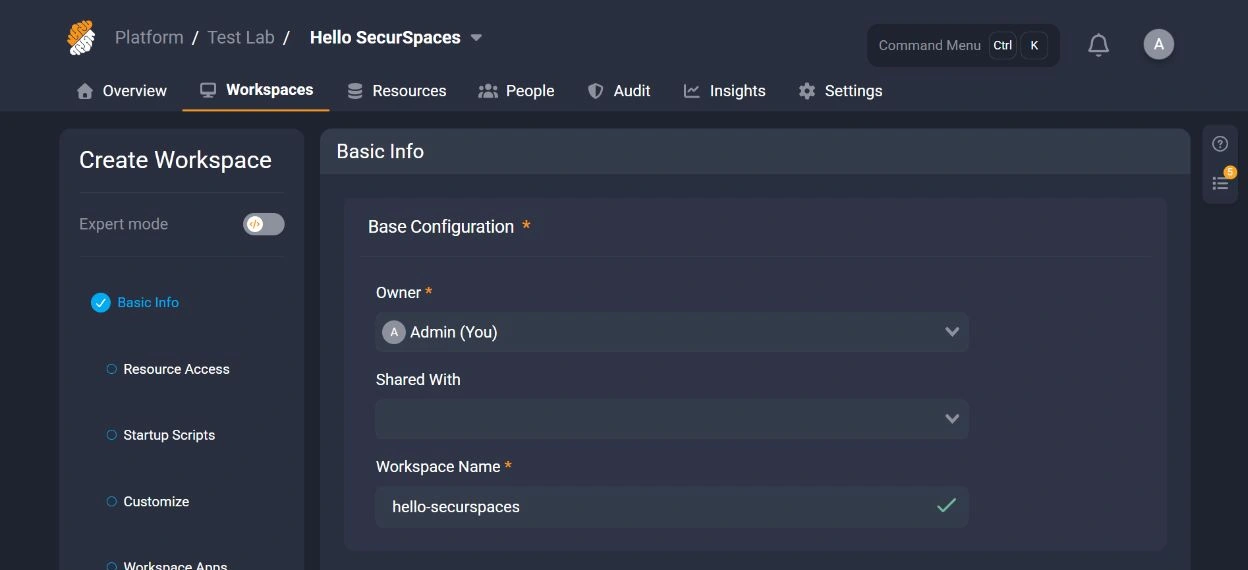
Choose **Create Custom Workspace** for this walkthrough. A template would be useful for repeating an established configuration; here I want to see the choices once. If the **Setup Checklist** covers part of the form, close that sidebar with its **X**.
I used these values:
| Setting | Value |
| --- | --- |
| Name | `hello-securspaces` |
| Owner | Admin (my signed-in user) |
| Workspace image | Default Generic Image |
| Image tag | `2.3.7` |
| Browser IDE | Platform default: Strong IDE `1.138.0` |
| Region | Default Region |
Select **Admin (You)** explicitly in the owner picker and replace the generated workspace name with the complete name above. Keep the workspace private to your user for this first test. I didn't attach secrets, external services or repository credentials.
hello-securspaces, assigned to my user in Hello SecurSpaces.
The [Citrix workspace creation documentation](https://docs.citrix.com/en-us/securspaces/develop/workspaces/create.html) describes the available fields. Choose the name and region carefully: those are fixed after creation.
### 11. Select Minimal and launch
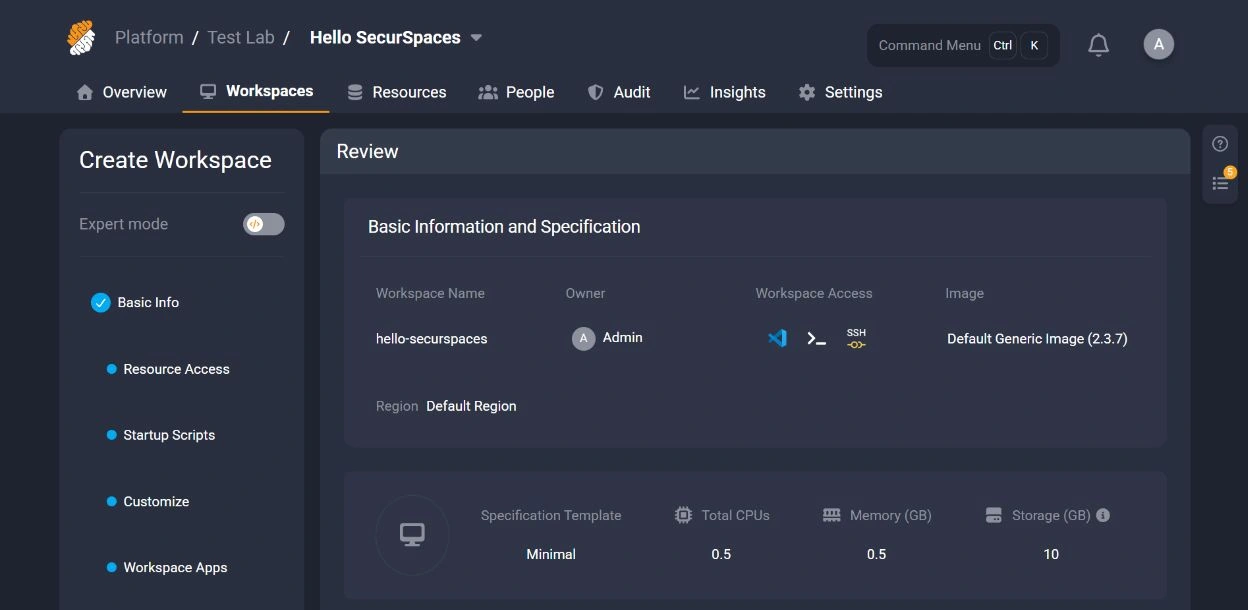
The fresh installation offered only the **Minimal** workspace profile:
- 0.5 CPU
- 0.5 GB RAM
- 10 GB storage
These are the workspace's settings, separate from the 4-vCPU / 16-GB / 200-GB VM that also runs the platform services.
For this example I walked through every page of the creation wizard:
1. **Basic Info:** name, Admin owner, Default Generic Image, Default Region and Minimal resources as above.
2. **Resource Access:** no additional resources.
3. **Startup Scripts:** leave the startup command disabled.
4. **Customize:** keep the defaults, including the `/home/developer` working directory.
5. **Workspace Apps:** add no applications.
6. **Security Settings:** retain the demo defaults: No Policy, clipboard operations allowed with logging, no Personal SSH key.
7. **Schedule:** leave scheduling disabled.
8. **Review:** check the owner, image and resource values, then select **Launch**.
The wizard also offers **Review and Launch** as a shortcut after Basic Info. These are the defaults I tested in this isolated lab; a company environment needs its own access and security choices.
Review the image and resource profile before selecting Launch.
Choose **Launch** and wait for the workspace to become **Running**. Give the first start a little time to download the image and get the IDE ready.
### 12. Open the browser IDE
In the workspace's **Access** column, select the **VS Code** icon. SecurSpaces opens Strong IDE in a separate browser window.
That exposed a quirk of the embedded browser I was using: the new window never appeared. The workspace was healthy, but clicking the icon looked like it had done nothing. I opened the same workspace's IDE address directly in an embedded tab, which worked.
For this installation, the address has this shape:
```text
https://vscode-ws-WORKSPACE_ID.proxy.YOUR_ASSIGNED_NAME.try.sds.citrix.com/
```
This is the route observed in version `2026.9.0`, not a universal URL to paste unchanged. Use your workspace ID and assigned hostname. On your project's **Workspaces** page, select **Show Update Center** and find your workspace name beside its **Workspace ID**. In a browser that supports the launch window, the icon is the normal way in. Once opened, bookmark the working IDE address if useful; it still requires your lab session.
The initial editor opened my `/home/developer` folder in Restricted Mode. Because this was my newly created lab workspace, I used **Manage → Trust** for that folder. Make that decision based on whose files you are opening.
For the screenshots, I selected the editor's native **Dark 2026** color theme with **Ctrl+K**, then **Ctrl+T**, and hid the unused chat sidebar. The platform theme and IDE theme are separate settings.
### 13. Create and run a Python file
In the IDE, open the command palette with **Ctrl+Shift+P**, type **Terminal: Create New Terminal**, and press Enter.
Run these commands in that terminal:
```bash
mkdir -p ~/hello-securspaces
cd ~/hello-securspaces
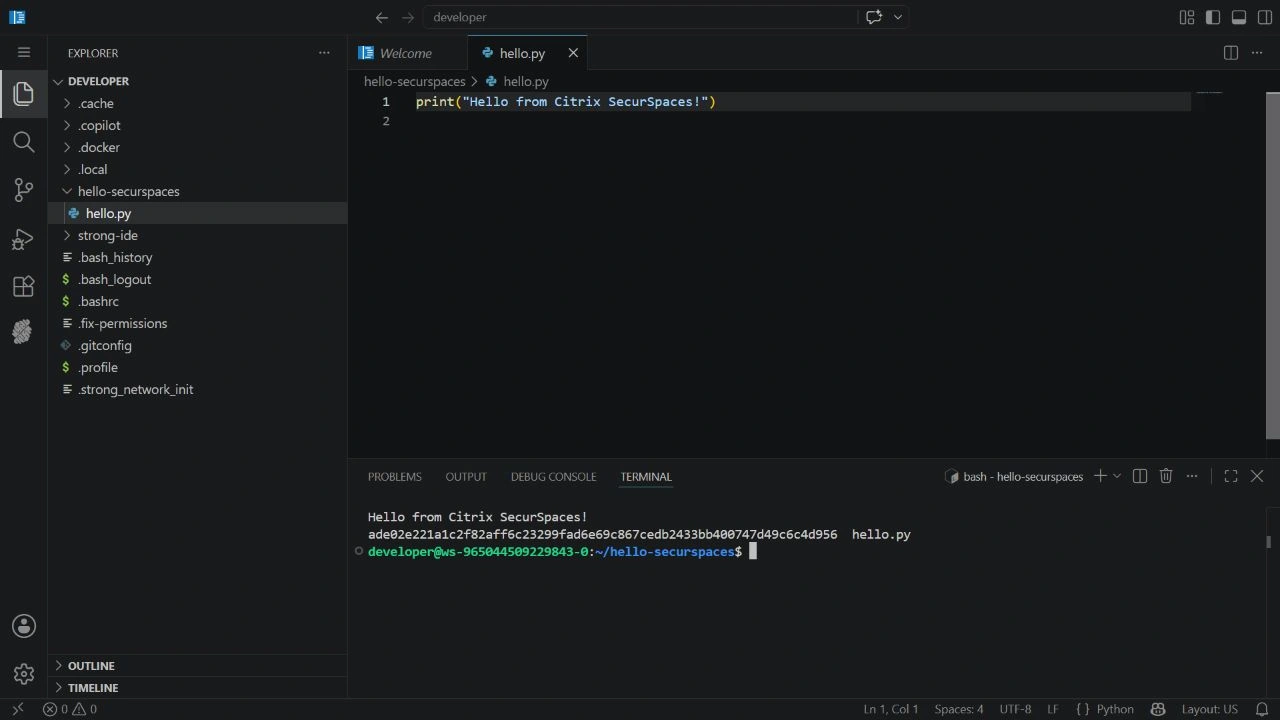
printf 'print("Hello from Citrix SecurSpaces!")\n' > hello.py
python3 hello.py
```
The result should be:
```text
Hello from Citrix SecurSpaces!
```
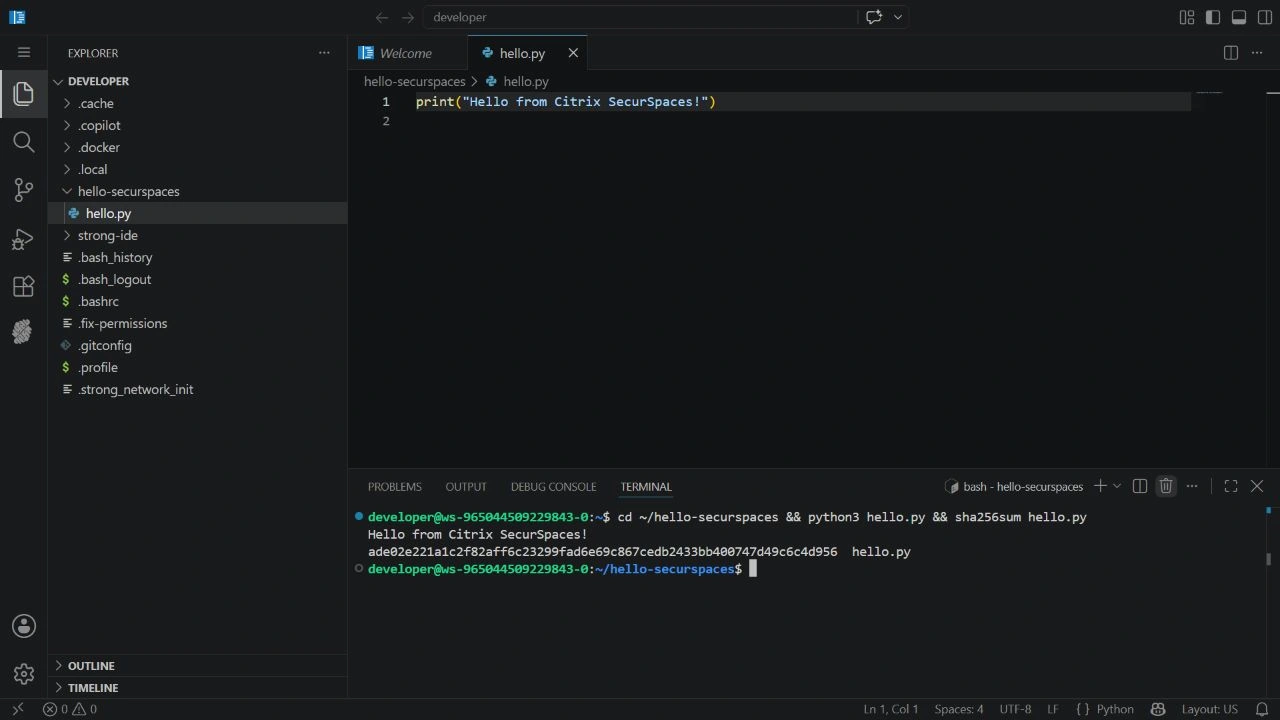
Press **Ctrl+P**, type `hello-securspaces/hello.py`, and open the file. You should see the same one-line program in the editor. This checks both sides of the experience: the terminal executed the code and the editor can open the saved file.
The saved Python file and its output in the browser IDE.
I saved the file under `/home/developer`. Citrix documents that directory as persistent workspace storage. Files elsewhere in the container and system-level package changes have different persistence behavior; use an image or the supported customization mechanisms for those. See [maintaining persistent changes](https://docs.citrix.com/en-us/securspaces/develop/what-persists.html).
### 14. Check memory use
Inside the **Ubuntu VM**, rather than the workspace terminal, I checked:
```bash
sudo kubectl top nodes
sudo kubectl top pods
free -h
```
Before creating my workspace, the guest used about 2.9 GiB, with roughly 12 GiB available. After opening the IDE and running Python, the node reported 4,545 MiB (28%) and my workspace pod 1,483 MiB. At that point `free -h` showed about 11 GiB available.
The sample workspace included with the evaluation was also running, using 805 MiB, so this is not an isolated one-workspace benchmark. The Minimal profile's 0.5-GB value was a resource request in this installation: the pod's two containers each requested 256 MiB and 250 millicores, with no resource limits configured. It was able to consume more than that request. Check measured usage rather than treating the profile label as a hard memory ceiling.
These are snapshots from a small Python exercise on the 16-GB VM. Bigger builds and additional workspaces need their own measurements.
## Restart
To finish the setup checks, verify that the saved file survives pausing the workspace and restarting the VM.
### 15. Check persistence through pause and resume
The file to keep is:
```text
/home/developer/hello-securspaces/hello.py
```
In the IDE terminal, run:
```bash
cd ~/hello-securspaces
python3 hello.py
sha256sum hello.py
```
A checksum gives a simple before-and-after comparison. Mine was:
```text
ade02e221a1c2f82aff6c23299fad6e69c867cedb2433bb400747d49c6c4d956
```
Your checksum will differ if you changed the text or line endings. The useful check is that your own value stays the same.
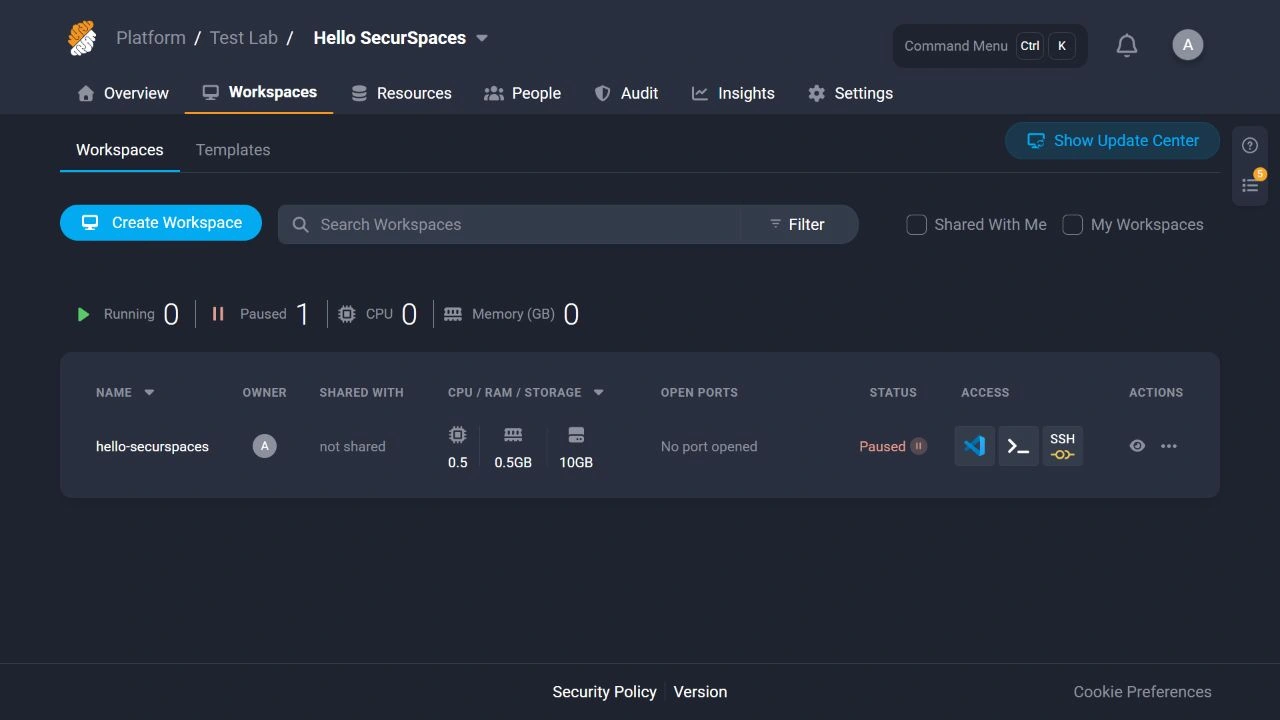
Return to the project's **Workspaces** page. Open the action menu for `hello-securspaces`, select **Pause**, and confirm. Wait until the row shows **Paused**.
Paused is the expected resting state for my personal workspace.
Open the same action menu and select **Run**. Wait for Running, then reopen or reload the IDE. Open `hello.py` and repeat the Python and checksum commands.
My output and checksum matched. The workspace's runtime was recreated, while the file in `/home/developer` remained available.
### 16. Reboot the VM
For this test I left my workspace running, then connected to the **Ubuntu VM** over SSH and ran:
```bash
sudo reboot
```
The SSH session disconnects. Give the guest time to shut down, boot, start K3s and bring up its applications. In my test this took several minutes, with temporary connection failures and application restarts while the database became ready. The installed MongoDB readiness probe had a 240-second interval, so the service could be listening before Kubernetes marked it Ready. I waited for that transition and the dependent services instead of reinstalling during startup.
On the Windows host, check the VM in Hyper-V Manager. In an administrator PowerShell, these commands show its state and guest address:
```powershell
Get-VM -Name SecurSpaces-Lab
Get-VMNetworkAdapter -VMName SecurSpaces-Lab |
Select-Object -ExpandProperty IPAddresses
```
My VM returned with the same address. Reconnect with SSH and check:
```bash
sudo kubectl get nodes
sudo kubectl get pods -A
systemctl --failed
```
Wait for the node to be Ready and the platform containers to be Ready. An HTTPS login page can be available before the rest of the system is ready.
After the platform returned, my workspace showed **Error** and the IDE did not open. In **Hello SecurSpaces → Workspaces**, I selected **Pause**, waited for **Paused**, then selected **Run**. Once it was **Running**, I reopened the IDE and repeated the Python and checksum commands. The same file ran successfully and its checksum matched.
After the VM restart and Pause → Run, the same saved file runs again in the browser IDE.
## A working lab on Hyper-V
I now have SecurSpaces running on Hyper-V, a Test Lab organization, and a workspace where I can edit and run Python in the browser. The saved file survived pause/resume and the VM restart.
For further configuration, workspace management, and troubleshooting, use the [official Citrix SecurSpaces documentation](https://docs.citrix.com/en-us/securspaces/). The documented evaluation routes are:
- [Deploy an evaluation environment](https://docs.citrix.com/en-us/securspaces/deploy/evaluation/): the starting point for cloud, XenServer, Hyper-V, other hypervisors, or bare metal.
- [Prepare a Hyper-V VM](https://docs.citrix.com/en-us/securspaces/deploy/evaluation/hyperv): the Hyper-V setup, followed by the shared installation and validation steps.
For production deployments on Kubernetes, start with [Deploy to a cluster](https://docs.citrix.com/en-us/securspaces/deploy/kubernetes/), then choose the guide for your platform:
- [Amazon EKS](https://docs.citrix.com/en-us/securspaces/deploy/kubernetes/aws-eks.html)
- [Azure AKS](https://docs.citrix.com/en-us/securspaces/deploy/kubernetes/azure-aks.html)
- [Google GKE](https://docs.citrix.com/en-us/securspaces/deploy/kubernetes/google-gke.html)
- [Red Hat OpenShift](https://docs.citrix.com/en-us/securspaces/deploy/kubernetes/openshift.html)
- [Nutanix Kubernetes Platform](https://docs.citrix.com/en-us/securspaces/deploy/kubernetes/nutanix.html)
I might try this on my Proxmox host next. That's a story for another post. ;)
---
**Disclosure Note:**
I work at Citrix. These are my personal views and experiences; I'm not speaking on behalf of the company.