
Welcome to a new blog series about building AI agents in .NET.
Yes, you read that right - I just said .NET. Not Python. C#. Curly braces. Strong typing. With drums and trumpets.
Over the coming posts, we'll explore the Microsoft Agent Framework, build actual agentic systems, and - most importantly - have some fun doing it. This first post sets the stage: why I'm doing this, what we're building, and how to get started with the companion repository.
Let's dive in.
Why, You Ask?
Honestly? I got a little restless. Every AI agent tutorial out there follows the same well-worn path:
- "Build a weather agent!" - Revolutionary stuff. Though I hear windows also exist.
- "Spam detection with AI!" - Gmail's been doing this since 2004.
- "Customer service chatbot!" - Oh good, we definitely need more of those.
We have the most powerful language models in human history at our fingertips. Surely we can do something a bit more... interesting? Where's the creativity? Where's the spark?
This series is about building agents that are genuinely smart, genuinely fun, or ideally both. No boring examples. No wrapping API calls in agent clothing and calling it intelligent.
As for the language choice - I've always been a C-family person. Python is lovely for what it does, but give me curly braces and strong typing any day. When Microsoft released the Agent Framework for .NET? Yeah, that got me genuinely excited. First-class AI agents in C#. Native support, proper tooling, the whole package.
The Microsoft Agent Framework
So what exactly are we working with? The framework comes with everything you need to build proper agentic systems:
- Native C# support (obviously)
- A beautiful DevUI for testing and debugging your agents - still in preview and missing some Python-side features, but it gets the job done
- Built-in patterns for common agentic scenarios (the fun stuff)
- Integration with the broader .NET ecosystem (finally!)
And that's what this blog series is all about.
About DevUI
Speaking of DevUI - if you head over to Microsoft's documentation and switch to the C# tab, you're greeted with this gem:
"DevUI documentation for C# is coming soon. Please check back later or refer to the Python documentation for conceptual guidance."
Ah yes, the classic "refer to Python" move. You know, the language we specifically chose not to use for this series? The irony isn't lost on me. But hey, I'm not bitter - I'm just impressed they managed to ship a working DevUI before the documentation. That's actually kind of bold.
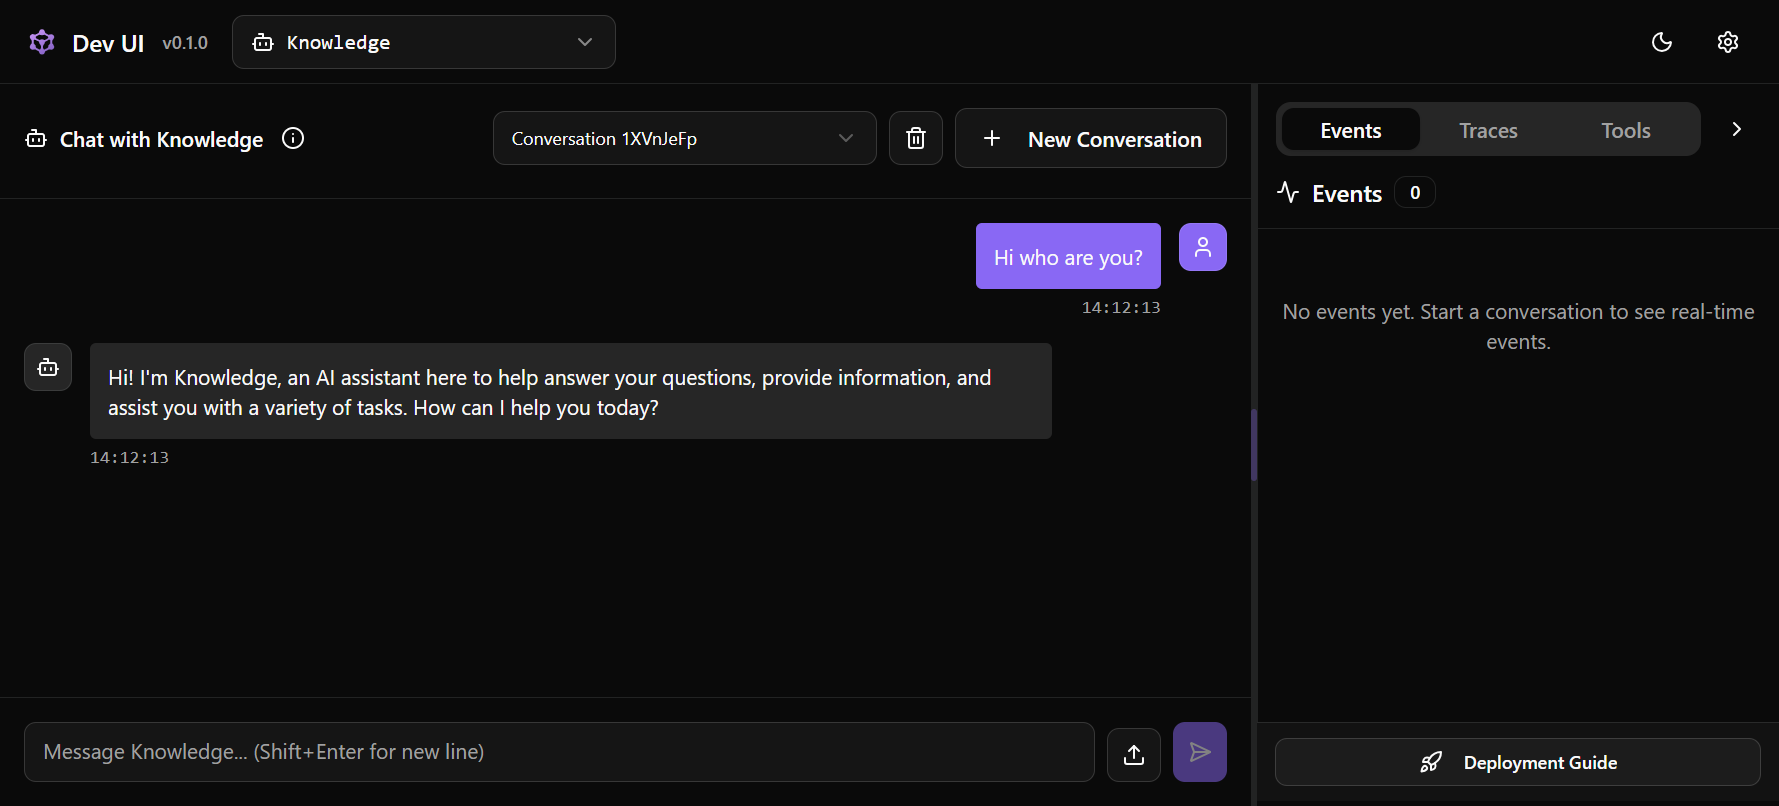
In all seriousness though, the DevUI itself is genuinely cool. It's a sleek web interface that lets you chat with your agents and see what's happening under the hood. Now, before you get too excited - this isn't OpenTelemetry with Jaeger-level tracing or anything like that. We'll dive into proper observability in a later post. But for quick iteration and debugging during development, DevUI does the job nicely. For a preview feature, it's surprisingly polished. Documentation will catch up eventually. Probably. Maybe. We'll see.
The Knowledge Repository
To support this series, I've created a companion repository called Knowledge. I briefly considered "AI-Stuff-I-Throw-Together-At-2AM" but that didn't seem like a good fit. So I thought about it - I'm deepening my own knowledge about AI as I create this series, and hopefully you'll gain some knowledge along the way too. Yeah, let's face it: Knowledge is simple. Sometimes simple works.
The repository is structured as a progressive learning path. Each branch builds on the previous one, taking you from zero to building sophisticated agentic systems. Here's what we're working with:
| Branch | Topic | What You'll Learn | Codespace |
|---|---|---|---|
main | Repository & Hello World Agent | Project setup, DevUI, your first conversational agent |
More branches will be added as the series progresses. And honestly? That Codespaces button is kind of magical - click it, grab a coffee, and come back to a fully configured dev environment. No setup, no dependencies, just ready to go. I still find that ridiculously cool.
Star the repo if you want to follow along!
Development Environment
You've got two options here - pick whichever fits your workflow.
Dev Container Setup
First things first: reproducible development environments. The repository includes a .devcontainer configuration with:
- .NET 10
- PostgreSQL with pgvector for when we get into embeddings and semantic search
- All the tooling pre-configured
Just open the repo in VS Code, click "Reopen in Container," and you're ready to go. The classic "works on my machine" problem? Solved.
Oh, and if you don't even want to bother with that - just open it in a Codespace and develop entirely in your browser. No local setup, no nothing. We live in the future and I'm here for it.
Classic
And for those of you rolling your eyes at all this container and cloud stuff - fair enough. Install the .NET 10 SDK, fire up VS Code or Visual Studio, clone the repo, and just go. Sometimes the old ways are the best ways. That said, you'll want to get PostgreSQL with pgvector set up sooner rather than later - we'll need it for embeddings and semantic search in upcoming posts.
What's on the Main Branch?
Let me walk you through what you'll find when you clone the repo. The main branch sets up everything you need to hit the ground running with AI agent development.
Project Structure
The solution is organized into two projects:
- Knowledge - The main web application that hosts our agents and the DevUI
- Knowledge.Shared - Shared configuration, extensions, and utilities
This separation keeps things clean as we add more complexity in future posts.
Configuration Done Right
One thing I'm particular about is handling configuration properly. In Knowledge.Shared, we have a KnowledgeSettings class that gives us strongly-typed access to our config values.
The important bits are these two properties:
public string ApiKey = string.Empty;
public string ApiEndpoint = string.Empty;
ApiKey is where your OpenAI (or compatible) API key goes. ApiEndpoint is optional - leave it empty and we'll hit OpenAI's default endpoint, or set it to point at Azure OpenAI, a local model, whatever you need.
Now, you definitely don't want to hardcode API keys in your source code. That's how keys end up on GitHub and suddenly you're funding a stranger's LLM experiments. Instead, we use .NET User Secrets:
Your key stays on your machine, outside of source control. Sleep well at night.
Wiring Up the Agent
Let's walk through Program.cs piece by piece. This is where everything comes together.
First, the imports - nothing too surprising here:
using .;
using ..;
using ...;
using ...;
using ..;
using ;
We're pulling in the Agent Framework (Microsoft.Agents.AI.*), Microsoft's AI abstractions (Microsoft.Extensions.AI), and the official OpenAI client. Standard .NET web app stuff otherwise.
Next, we create our builder and call into our configuration extension:
var builder = WebApplication.;
builder.;
ConfigureKnowledgeDefaults is a helper method in our shared project. It handles loading appsettings.json, binding it to our KnowledgeSettings type, and then gives us a callback where we can access both the settings and a logger. This keeps Program.cs clean while still giving us full control.
Inside that callback, we set up OpenAI. First, a sanity check:
if
Better to warn loudly than fail silently.
Then we create the OpenAI client options. If a custom endpoint is configured, we use it:
var options = ;
if
This is what lets you swap between OpenAI, Azure OpenAI, or even a local model running through something like Ollama with an OpenAI-compatible API.
Now we create the actual client and register it with dependency injection:
var client = ;
builder.Services.;
GetChatClient("gpt-4.1") gets us a chat client for that specific model. .AsIChatClient() wraps it in Microsoft's IChatClient abstraction, which is what the Agent Framework expects. Using this abstraction means we could swap out OpenAI for any other provider without changing our agent code.
And finally - the actual agent registration:
builder.;
That's it. One line. We give it a name and a system prompt, and the framework handles the rest. We'll make this more sophisticated in future posts, but for a "hello world" agent, this is all you need.
Finishing the Pipeline
After our configuration callback, we register a few more services:
builder.Services.;
builder.Services.;
These set up the Agent Framework's handlers for OpenAI's responses and conversations API patterns.
Then we build the app and configure the HTTP pipeline:
var app = builder.;
app.;
ConfigureKnowledgePipeline is another shared helper - it sets up logging, error handling, and other middleware that we'll want across all our experiments.
Finally, we map our endpoints:
app.;
app.;
app.;
app.;
app.;
MapOpenAIResponses() and MapOpenAIConversations() expose endpoints that follow OpenAI's API patterns. MapDevUI() gives us the Agent Framework's built-in developer interface - which is honestly one of the best parts of this whole framework.
That last MapGet just redirects the root URL to the DevUI. Because when you're developing agents, that's where you want to be.
Running the Application
Once configured, getting started is simple:
Navigate to http://localhost:5000/devui and you'll see the DevUI - a beautiful interface for interacting with your agents, inspecting their reasoning, and debugging when things inevitably go sideways.
Wrapping Up
We've covered a lot of ground in this introductory post. You now have:
- A companion repository with a reproducible dev container setup
- A working "hello world" agent using the Microsoft Agent Framework
- Proper configuration with user secrets (no API keys in source control!)
- The DevUI for testing and debugging your agents
The foundation is solid. Now comes the fun part.
What's Next?
We've got the foundation in place - a working agent, DevUI, proper configuration. But let's be real: a "hello world" agent isn't going to impress anyone, least of all ourselves.
There's a lot we'll explore from here. We'll give our agent actual tools so it can do things, not just talk about them. We'll look at multi-agent scenarios where systems collaborate to solve problems. Remember that PostgreSQL with pgvector sitting in our dev container? That's not just decoration - we'll put it to work when we dive into embeddings and semantic search. And that proper observability story I mentioned earlier? We'll get there too.
But first things first. Step by step.
If you're a .NET developer who's been watching the AI agent space from the sidelines, wondering when C# would get some love - welcome. If you're just someone who's bored of the same old tutorials and wants to see something different - also welcome.
Clone the repo, star it if you're feeling generous, and let's build something that's actually worth building.
See you in the next post. 🚀